Date Difference Calculator
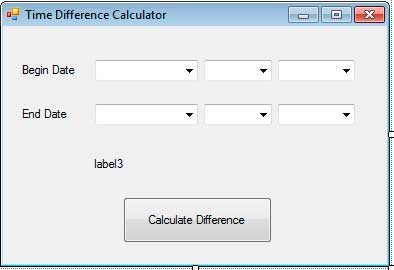
This tutorial guides you through the creation of a Time Difference Calculator which determines the difference of two given dates and returns the result in days. The program uses the System.DateTime and System.TimeSpan methods. This tutorial will also practice your skills on using events and the ComboBox control. Create a new Windows Forms application and name it TimeDifferenceCalculator. Then add and arrange controls until it looks like the one seen below:

Optionally change the Text property of the form and the FormBorderStyle to FixedSingle to disable resizing.
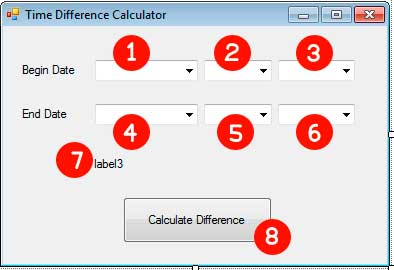
Change the Name property of the following numbered controls.

| Number | Name |
|---|---|
| 1 | comboBeginDateMonth |
| 2 | comboBeginDateDay |
| 3 | comboBeginDateYear |
| 4 | comboEndDateMonth |
| 5 | comboEndDateDay |
| 6 | comboEndDateYear |
| 7 | labelResult |
| 8 | buttonCalculate |
Empty the Text property of labelResult as it will be filled by the result once the calculation has been completed. Double-click the Form (not the controls) to create an event handler for the Load event of the form. Add the code shown below.
private void Form1_Load(object sender, EventArgs e)
{
    //Define the months
    string[] months =
    {
        "January", "February", "March", "April",
        "May", "June", "July", "August",
        "September", "October", "November", "December"
    };

    //Fill up the month combo boxes
    for (int i = 0; i < 12; i++)
    {
        comboBeginDateMonth.Items.Add(months[i]);
        comboEndDateMonth.Items.Add(months[i]);
    }

    //Set January as default month
    comboBeginDateMonth.SelectedIndex = 0;
    comboEndDateMonth.SelectedIndex = 0;

    //Fill up the year combo boxes
    for (int i = 1; i <= DateTime.Now.Year; i++)
    {
        comboBeginDateYear.Items.Add(String.Format("{0:0000}", i));
        comboEndDateYear.Items.Add(String.Format("{0:0000}", i));
    }

    //Set default year to 2000
    comboBeginDateYear.SelectedIndex = 1999;
    comboEndDateYear.SelectedIndex = 1999;

    //Fill up the day combo boxes
    FillDays(comboBeginDateDay, "Begin");
    FillDays(comboEndDateDay, "End");

    //Attach event handlers
    comboBeginDateMonth.SelectedIndexChanged += new EventHandler(RecalculateDays);
    comboBeginDateYear.SelectedIndexChanged += new EventHandler(RecalculateDays);
    comboEndDateMonth.SelectedIndexChanged += new EventHandler(RecalculateDays);
    comboEndDateYear.SelectedIndexChanged += new EventHandler(RecalculateDays);
}
The first thing we did is create a string array containing the 12 months. We then used a for loop to add the months to the two combo boxes that represent the month. We used the Add method of the Item property of the ComboBox class to do just that. We then set the SelectedIndex property of the two combo boxes to 0 so that it will point to the first item which is January. It is important to note that the indexes in a combo box is base 0 so the counting will start at 0.
We then fill up the year combo boxes with years ranging from 1 to the current year. We retrieve the current year through the Yearproperty of the Now property of the DateTime class. The Now property represents the current date and time. We added each year to the two combo boxes representing the year. We also formatted each year to have leading zeros so each year will always have 4 digits. We set the default year to 2000 by giving the value 1999 to the SelectedIndex property of each year combo box. Remember that the SelectedIndex is 0-based so index 1999 represents 2000. Note that we can use the String Collection Editor by switching to the Designer View, clicking the desired combo box, and searching for the Items property. Click the button with three dots and you will arrive at the editor where you can just type each item for the combo box. But doing this would be tedious as you need to type all 2000(or more) values. That’s why it is more efficient to add the values using code if there are too many items.
The FillDays method that we will create later, fills the combo boxes that represent the day, with the right number of days because not all months have the same number of days and we also need to consider leap years.
The last 4 lines of code attach an event handler to the SelectedIndexChanged event of each combo box. This event will trigger if the selected index or item is changed. We will create this one event handler that will be shared by the four controls. We need to add this event handler to the month combo boxes and the year combo boxes so that once the user changes the year or the month, then the items inside the day combo boxes will be automatically updated. I decided to add the event handlers in the last part because we change the SelectedIndex property of the comboBoxes so doing that will trigger the event and execute the event handler which will process the previously empty combo boxes. That will produce an error.
Let’s now create the FillDays method. This method fills the right number of days to the specified combo box. This method will accept a ComboBox as an argument and a second parameter that accepts a string indicating whether to update the comboBeginDateDay or the comboEndDataDay combo box.
private void FillDays(ComboBox comboBox, string tag)
{
    int selectedMonth;
    int selectedYear;

    if (tag == "Begin")
    {
        selectedMonth = comboBeginDateMonth.SelectedIndex + 1;
        selectedYear = comboBeginDateYear.SelectedIndex + 1;
    }
    else
    {
        selectedMonth = comboEndDateMonth.SelectedIndex + 1;
        selectedYear = comboEndDateYear.SelectedIndex + 1;
    }


    int maxDay = DateTime.DaysInMonth(selectedYear, selectedMonth);

    comboBox.Items.Clear();

    for (int i = 1; i <= maxDay; i++)
    {
        comboBox.Items.Add(i);
    }

    comboBox.SelectedIndex = 0;
}
First, we identify which month and year combo boxes to get values from by testing it to the tag parameter. We then assigned the selected indexes plus 1 to variables that will be used by the DaysInMonth method. We then use the DaysInMonth static method of the DateTimeclass to check the number of days of the specified month of the specified year. We cleared the items of the combo box to update. We update the number of days be reading the days using a for loop. Finally, we set the SelectedIndex of the referenced combo box to 0 so it will have a default value of 1.
Find the Form1 constructor and add the highlighted code.
public Form1()
{
    InitializeComponent();

    comboBeginDateMonth.Tag = "Begin";
    comboBeginDateYear.Tag = "Begin";
    comboEndDateMonth.Tag = "End";
    comboEndDateYear.Tag = "End";
}
We added those values to the Tag properties so that the following method, RecalculateDays, can determine the right combo box to update.
private void RecalculateDays(object sender, EventArgs e)
{
    if ((sender as ComboBox).Tag.ToString() == "Begin")
        FillDays(comboBeginDateDay, "Begin");
    else
        FillDays(comboEndDateDay, "End");
}
Note that this method serves as an event handler to the SelectedIndex event which expects a method that matches its delegate, EventHandler, that accepts an object and an EventArgs object. The method contains an if statement. We first convert the senderwhich is the control that triggered the event, to a ComboBox then use the Tag property and converted it to string. We then compare the result to the string “Begin” so that the program will determine which combo box to update.
Go back to Designer View and double click buttonCalculate to create a Click event handler. Add the following code.
private void buttonCalculate_Click(object sender, EventArgs e)
{
    DateTime beginDate = new DateTime(
        comboBeginDateYear.SelectedIndex + 1,
        comboBeginDateMonth.SelectedIndex + 1,
        comboBeginDateDay.SelectedIndex + 1);

    DateTime endDate = new DateTime(
        comboEndDateYear.SelectedIndex + 1,
        comboEndDateMonth.SelectedIndex + 1,
        comboEndDateDay.SelectedIndex + 1);

    TimeSpan difference = endDate.Subtract(beginDate);

    labelResult.Text = String.Format("{0} Days", difference.Days);
}
Once the button is clicked, the begin and end dates are created based on their respective set of combo boxes. We then calculate the difference by using the Subtract method. This method returns a TimeSpan object. Finally, we show the difference of the two dates in days to labelResult.
More upgrades can be done to this program. For example, you can add more combo boxes for the hours, minutes, and seconds. You can also show the difference in years and months (although you need to take into account leap years). You can use the IsLeapYear method to determine if the specified year is a leap year.