Updating Records: Connected Approach
We will now take a look at updating the fields of records in a database table. Like inserting and deleting records, updating also uses the DbCommand.ExecuteNonQuery() method. The steps are pretty much similar when updating a record using the connected approach.
- Create a Connection
- Create a Command
- Specify connection string to Connection
- Specify Connection that the Command will use
- Specify the UPDATE statement for the CommandText of the Command
- Add values to command parameters if any
- Open Connection
- Execute the Command
- Close Connection
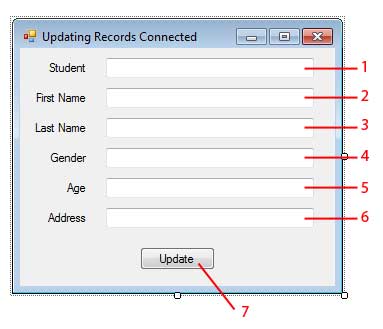
The steps above are used for updating a record. Let’s take a look at an example application. You type the StudentID and the new values for the fields corresponding to the ID. In a more realistic program, the current values will be shown first to you. But for simplicity, we will only show Therefore, we need to query values from the database. After the details are shown, the user can then edit details and send the changes to the database. Create a new Windows Forms Application and name it UpdatingRecordsConnected.

| Label | Name |
|---|---|
| 1 | textBoxStudentID |
| 2 | textBoxFirstName |
| 3 | textBoxLastName |
| 4 | textBoxGender |
| 5 | textBoxAge |
| 6 | textBoxAddress |
| 7 | buttonUpdate |
Figure 1
Double-click the Update button to generate an event handler for its Click event. Use the following code:
private void buttonUpdate_Click(object sender, EventArgs e) { SqlConnection connection = new SqlConnection(); SqlCommand command = new SqlCommand(); connection.ConnectionString = @"Data Source=.SQLEXPRESS;" + "Initial Catalog=University;Integrated Security=SSPI"; command.Connection = connection; command.CommandText = "UPDATE Students SET [email protected], " + "[email protected], [email protected], [email protected], [email protected] " + "WHERE [email protected]"; command.Parameters.Clear(); command.Parameters.AddWithValue("@FirstName", textBoxFirstName.Text); command.Parameters.AddWithValue("@LastName", textBoxLastName.Text); command.Parameters.AddWithValue("@Gender", textBoxGender.Text); command.Parameters.AddWithValue("@Age", textBoxAge.Text); command.Parameters.AddWithValue("@Address", textBoxAddress.Text); command.Parameters.AddWithValue("@StudentID", textBoxStudentID.Text); try { connection.Open(); int result = command.ExecuteNonQuery(); if (result > 0) MessageBox.Show("Update Successful!"); else MessageBox.Show("Update Failed!"); } catch (SqlException ex) { MessageBox.Show("An error occured."); } finally { connection.Close(); } }Example 1
Lines 9-11 specifies the UPDATE SQL command that will be used to update the row specified by the StudentID of its WHERE clause. We used command parameters on the command. Line 13 first clears any content of the Parameters property of our command because it may still contain the parameters of the previous operation. Lines 14-19 uses the DbParameter.AddWithValue() method to add values to corresponding command parameters in our SQL command string. Since an SQL UPDATE is a non-query command (it doesn’t return any records or results), line 24 uses the DbCommand.ExecuteNonQuery() method to update the specified record. The return value of this method is the number of rows affected. To confirm that a record was successfully updated, we checked if the result is 1 or above (line 26) and then we showed a success message.
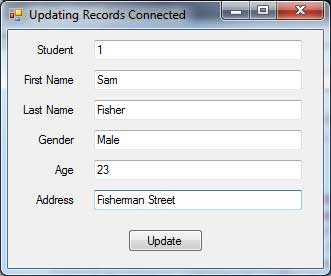
Run the program and type the StudentID you wan’t to edit along with the new values it will contain.

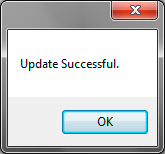
If no error is found, then a success message will pop out and the record in the database table will be modified.

The program in this lesson simple shows how to update a record. But it will be hard to update a record without knowing the current values first. A separate tutorial will apply everything we have learned (querying, inserting, deleting, updating). But first, let’s take a look at how to update records using the disconnected approach.