Querying a Database: Connected Approach
Querying is the process of retrieving data from a data source such as a database. We can do queries using the SELECT statement of the SQL. You will learn how to use this statement to query a table in a database using ADO.NET classes. We will present the connected approach of querying data from the data source. The following are the basic steps you should follow when querying results with an open connection.
- Create A Connection
- Create A Command
- Create A DataReader
- Specify connection string for the Connection
- Specify Connection that will be used for the Command
- Specify the CommandText that will be executed by the Command
- Add values to command parameters (if any).
- Open the Connection
- Execute DataReader
- Read every row from the result set
- Close the Reader
- Close the Connection
With this steps, we can already query a table of data from the database. To demonstrate these steps, let’s create a new Windows Forms Application and name it QueryingDatabaseConnected. Add a ListBox control to the form and name it studentsListBox.
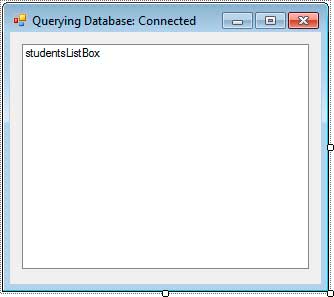
Figure 1
Double-click the title bar to generate an event handler for the form’s Load event. Be sure to import the System.Data.SqlClient at the top.
using System.Data.SqlClient;Use the following code for the Load event handler.
private void Form1_Load(object sender, EventArgs e)
{
    SqlConnection connection = new SqlConnection();
    SqlCommand command = new SqlCommand();
    SqlDataReader reader;

    connection.ConnectionString = @"Data Source=.SQLEXPRESS;Initial Catalog=University;"
                                 + "Integrated Security=SSPI";
    command.Connection = connection;
    command.CommandText = "SELECT FirstName, LastName, Age FROM Students";

    connection.Open();
    reader = command.ExecuteReader();

    while (reader.Read())
    {
        string firstName = reader["FirstName"].ToString();
        string lastName = reader["LastName"].ToString();
        int age = Convert.ToInt32(reader["Age"]);

        studentsListBox.Items.Add(String.Format("{0} {1}, {2}",firstName,lastName,age));
    }

    reader.Close();
    connection.Close();
}
Example 1
Line 3 creates a Connection object (Step 1). Line 4 creates a command object (Step 2). Line 5 declares a reader object (Step 3). Line 7 assigns the proper connection string for our connection (Step 4). The connection string uses the SQLEXPRESS server instance and the University database as the initial database. Line 9 assigns the Connection to be used by the Command object (Step 5). Line 10 specifies the SQL command for the Command object (Step 6). The command specifies that we get the FirstName, LastName, and Age of every record from the Students table. The SQL command assigned to the CommandText of the Command has no parameters so we can skip Step 7 which adds the required values to command parameters. We then open the connection in line 12 by using the DbConnection.Open() method (Step 8). Line 13 creates a DbDataReader instance using the DbCommand.ExecuteReader() method and we assigned the returned DbDataReader object to a variable so we can use it later (Step 9). Lines 15 to 22 iterates each row of the result set returned by executing the SELECT statement of the Command (Step 10). We used the DbDataReader.Read() method to obtain the first row of the result set. If there is at least one row available, the Read() will return true and the loop will continue. We then assigned the values of each column to their specific variables(lines 17-19). We used the indexer for the DbDataReader object that accepts a string representing the name of the column. We then converted their results to proper data types. For example, we converted the content of reader[“Age”] to integer and stored it to an integer variable. Line 21 simply adds the retrieved data to the Items of the ListBox. After the first loop, the Read() method will execute again and obtain the next row in the result set. If no more records are found, then Read()will return false and exit the loop. After exiting the loop, we closed the DataReader in line 24 (Step 11) and also the Connection in line 25 (Step 12). Execute the program and you will see the following output.
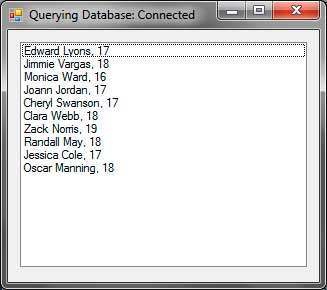
Figure 2
By using a while loop in our code, the Read() method was executed until no more records are found. Each record was then added to the ListBox and presented to the user.
You can simplify the code even more by taking advantage of the overloaded constructors of the DbConnection and DbCommand classes. For example, you can simply combine Step 1 and Step 4 by using the DbConnection‘s overloaded constructor that accepts the connection string.
SqlConnection connection = new SqlConnection(@"Data Source=.SQLEXPRESS;" +
"Initial Catalog=University;Integrated Security=SSPI");
You can combine Steps 2, 5, 6 by using the DbCommand‘s overloaded constructor that accepts the command text and the connection to be used.
SqlCommand command = new SqlCommand(
 "SELECT FirstName, LastName, Age FROM Students", connection);
Another thing is that we can use the using statement when creating a connection. Consider the following modifications to the code in Example 1.
using (SqlConnection connection = new SqlConnection())
{
    SqlCommand command = new SqlCommand();
    SqlDataReader reader;

    connection.ConnectionString = @"Data Source=.SQLEXPRESS;Initial Catalog=University;"
                                 + "Integrated Security=SSPI";
    command.Connection = connection;
    command.CommandText = "SELECT FirstName, LastName, Age FROM Students";

    connection.Open();
    reader = command.ExecuteReader();

    while (reader.Read())
    {
        string firstName = reader["FirstName"].ToString();
        string lastName = reader["LastName"].ToString();
        int age = Convert.ToInt32(reader["Age"]);

        studentsListBox.Items.Add(String.Format("{0} {1}, {2}",
                                  firstName, lastName, age));
    }

    reader.Close();
}
Example 2
The whole connection process was enclosed inside the using block. On the first line of the using statement, we placed the declaration and initialization of the Connection object. This signifies the using block to immediately destroy the Connection the moment it exits the block. So if the execution reaches the closing brace of the using block, our Connection will be destroyed, and as a result, it will automatically be closed. That’s why, we can omit the call to DbCommand.Close() method. This technique is better because it ensures that the connection will be closed when you are finished using it. Note that the Connection object will no longer be accessible once the execution leaves the using block.
Another good practice is enclosing the connection process into a try catch finally block. This ensures the program that it can handle any database errors or exceptions it can encounter during runtime. Suppose for example that the connection string is wrong or the connection has timed out, then exceptions will be thrown and you need to handle them. We can start adding the try block from the line where the DbConnection.Open() was called.
try
{
   connection.Open();
   reader = command.ExecuteReader();

   while (reader.Read())
   {
       string firstName = reader["FirstName"].ToString();
       string lastName = reader["LastName"].ToString();
       int age = Convert.ToInt32(reader["Age"]);

       studentsListBox.Items.Add(String.Format("{0} {1}, {2}",
                                 firstName, lastName, age));
   }
}
catch (SqlException e)
{
   MessageBox.Show(e.Message);
}
finally
{
   reader.Close();
   connection.Close();
}
Example 3
From the moment of opening the connection to accessing the contents of each row, exceptions can be thrown so we enclosed all of them in a try block. We used the SqlException class in the catch block (line 16) which is an SQL Server provider’s version of DbException, to handle any database related errors. We then show the error message to the user using the Message property. We placed the codes that close the DataReader and the Connection (lines 22-23) inside the finally block. We did this to ensure that this codes will always execute regardless of whether exceptions were found or not. If you used a using statement as shown earlier, then you won’t have to write the code for closing the Connection. Try to get a habit of using exception handling when connecting and accessing a data source.