Modifying Fonts (An Example)
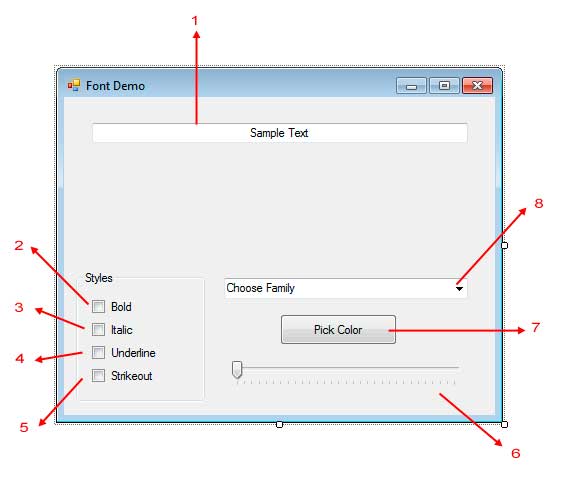
The following is an example application showing how we can modify a control’s Font property using other controls and components. We will use the techniques we have learned earlier to modify the font. Create a new Windows Forms Application and name it FontDemo. Below shows the GUI of the application we will create.
| Label | Type | Name | Properties Values | |
|---|---|---|---|---|
| 1 | TextBox | fontTextBox | Text | Sample Text |
| TextAlignment | Center | |||
| 2 | CheckBox | boldCheckBox | Text | Bold |
| 3 | CheckBox | italicCheckBox | Text | Italic |
| 4 | CheckBox | underlineCheckBox | Text | Underline |
| 5 | CheckBox | strikeoutCheckBox | Text | Strikeout |
| 6 | TrackBar | sizeTrackBar | Minimum | 10 |
| Maximum | 40 | |||
| 7 | Button | colorButton | Text | Pick Color |
| 8 | ComboBox | familyComboBox | Text | Choose Family |
The user can choose from different styles using the check boxes (2 to 5) provided. When checked, the style is applied to the text in the text box. When unchecked, the style is removed from the styles of the font. We provide a combo box that will contain the names of all the installed font in your system. The user can then choose from those names and it will be applied to the font of the text box. The button (7) when clicked, will show a ColorDialog to allow the user to pick a color and apply it to the font. The track bar (6) is used to change the font size of the text inside the text box based on the position of the thumb of the track bar.
Using Bitwise XOR to Apply or Remove a FontStyle
Let us now add the functionality of our application. We will start with the check boxes that provides the style for the font. Double click each check box to generate CheckedChange event handlers. Use the following event handlers.
private void boldCheckBox_CheckedChanged(object sender, EventArgs e)
{
    fontTextBox.Font = new Font(fontTextBox.Font, fontTextBox.Font.Style ^ FontStyle.Bold);
}

private void italicCheckBox_CheckedChanged(object sender, EventArgs e)
{
    fontTextBox.Font = new Font(fontTextBox.Font, fontTextBox.Font.Style ^ FontStyle.Italic);
}

private void underlineCheckBox_CheckedChanged(object sender, EventArgs e)
{
    fontTextBox.Font = new Font(fontTextBox.Font, fontTextBox.Font.Style ^ FontStyle.Underline);
}

private void strikeThroughCheckBox_CheckedChanged(object sender, EventArgs e)
{
    fontTextBox.Font = new Font(fontTextBox.Font, fontTextBox.Font.Style ^ FontStyle.Strikeout);
}
For each event handler, we created a new Font using the constructor that accepts a Font and a new font style. In the first argument of each constructor, we passed the actual font of the fontTextBox to preserve the settings such as the size and the family used. In the second argument of each constructor, we used the bitwise XOR operator between the current Style of the fontTextBox and the style to be applied or removed. Recall that bitwise XOR can act as a toggle mechanism that applies a style if that style does not yet applied, or remove it if its already applied.
Changing Font Size
We used a TrackBar control to allow the user to change the size of the font of the fontTextBox. The TrackBar‘s Minimum and Maximumproperties have been set to 10 and 40 respectively so the user can only select font sizes from 10 to 40. Double click the track bar to generate an event handler for its Scroll event. Use the following event handler.
private void sizeTrackBar_Scroll(object sender, EventArgs e)
{
    fontTextBox.Font = new Font(fontTextBox.Font.FontFamily, sizeTrackBar.Value,
        fontTextBox.Font.Style, fontTextBox.Font.Unit);
}
We used the Font’s constructor that accepts four arguments. We simply passed the current family, style, and unit used by fontTextBoxto preserve those settings when we change the size of the font. The second argument specifies the size of the new font so we used the TrackBar‘s Value property to retrieve the value selected by sizeTrackBar.
Loading All Installed System Fonts
The combo box (9) will be used to select the font family used by the text of the text box. We can either enumerate a list of font family names, or you can load the names of all the installed fonts in your system. We will do the latter and add the list when the form has loaded so double click the title bar of the form to generate an event handler for the Form’s Load event.
private void Form1_Load(object sender, EventArgs e)
{
    InstalledFontCollection fonts = new InstalledFontCollection();

    foreach (FontFamily font in fonts.Families)
    {
        familyComboBox.Items.Add(font.Name);
    }
}
The InstalledFontCollection class allows you to access and enumerate all the fonts installed in your system. Please note that this class is contained inside the System.Drawing.Text namespace so you must import it first at the top of the program. We used a for loop to iterate each of the FontFamily item contained inside the Families property of the InstalledFontCollection class. The Familiesproperty contains a collection of FontFamily objects which represents the installed fonts.
Back in the designer, double-click the combo box to generate its SelectedIndexChanged event handler. Use the following event handler.
private void familyComboBox_SelectedIndexChanged(object sender, EventArgs e)
{
    fontTextBox.Font = new Font(familyComboBox.SelectedItem.ToString(),
        fontTextBox.Font.Size, fontTextBox.Font.Style, fontTextBox.Font.Unit);
}
We create a new Font object using the constructor of Font that accepts four arguments. The most notable one is the first one which specifies the font family to use. We use the SelectedItem property of familyComboBox to get the item that is selected in the familyComboBox and convert it to text using the ToString() method. We passed the current size, style, and unit used by the fontTextBox to the constructor to preserve those settings when the font family is changed.
Changing the Color Using ForeColor Property
The color of the font is actually not handled by the Font itself. We use the ForeColor property of the control to set the color of the text of a control. Double click colorButton and use the following code for its Click event.
private void colorButton_Click(object sender, EventArgs e)
{
    ColorDialog colorDialog = new ColorDialog();

    if (colorDialog.ShowDialog() == DialogResult.OK)
        fontTextBox.ForeColor = colorDialog.Color;
}
When you click the button, we create a ColorDialog and show it to the user using ShowDialog() method to allow him/her to select a color. We then tested if the value returned by ShowDialog() is DialogResult.OK, which means the user clicked the OK button in the dialog. If so, then we applied the color chosen by the user to the ForeColor property of the control using the ColorDialog‘s Colorproperty.