Querying a Database with LINQ to SQL
We will be creating a Windows Forms Application that allows as to you to query and view records from a particular table using LINQ to SQL classes, SQL Server 2008, and the Northwind sample database. You will learn how to use the Object Relational Designer to generate LINQ to SQL Classes and how to use them in your code.
Creating LINQ to SQL Classes
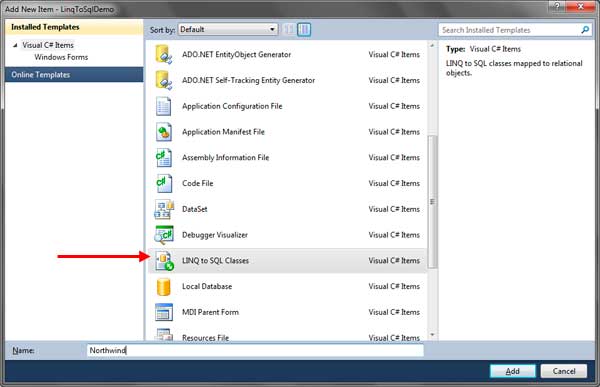
Create a new Windows Forms Application and name it LinqToSqlDemo. Once a project is created, we need to add a LINQ to SQL file. Click the Add New Item button in the toolbar and find LINQ to SQL Classes from the list of templates. Name it Northwind and click the Add button.
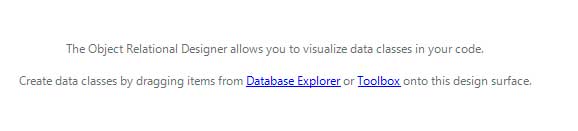
Once you click the Add button, you will land on the Object Relational Designer containing nothing as off now.
The Toolbox now also contains components used for creating classes and adding relationships. But since we will generate a class from an existing table in a database, we wont be using the components in the Toolbox. A DBML file (Database Markup Language) with extension .dbml will also be created and shown in the Solutions Explorer. Expanding that node will show two more files representing codes for the layout and the actual classes that will be generated. Double clicking the DBML file will also bring you to the Object Relational Desinger.
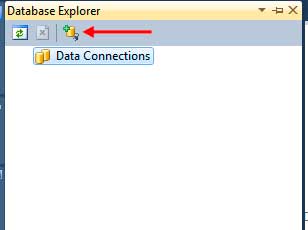
We need to use the Database Explorer window in Visual C# Express. If you are using the full version of Visual Studio, you need to open the Server Explorer window instead. If it is not visible, go to Views > Other Windows > Database Explorer. Open the Database Explorer window and click the Connect to Database icon.
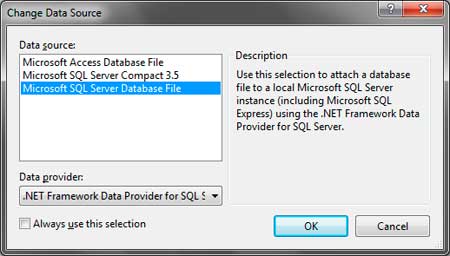
You will be presented with the Choose Data Source Dialog which asks which type data source to use for the connection. Choose SQL Server Database File. Checking the check box allows you to always choose the specified type of data source when you want to add another one.
You will be presented by another window asking for the type of data source and the location of the database files. You can also specify which SQL Server account to use but if you are using an administrator windows user account, then you can simply leave the default option. You can also click the Advanced button to edit more advanced settings about the connection.
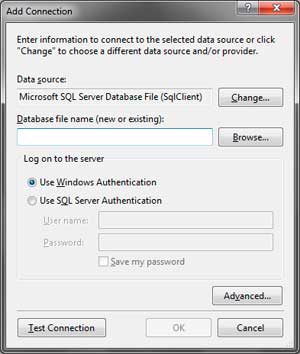
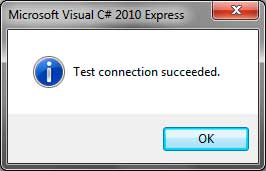
Click the Browse button and browse for the Northwind.mdf file. If you have installed it already, it will be located at C:SQL Server 2000 Sample Databases. Choose the file and click Open. Be sure that the file is not used by other programs. We then need to test the connection. Click Test Connection button and if everything is working properly, you will receive the following message.
The Northwind.mdf will now appear as a child node of the Data Connections in the Database Explorer window. Expand the Northwind.mdf node to be presented with folders representing the different components of the database. Expand the Tables folder to see the different Tables of the Northwind database. We need to drag tables from the Database Explorer window to the Object Relational Designer’s surface. For this lesson, drag the Employees table to the Object Relational Designer.

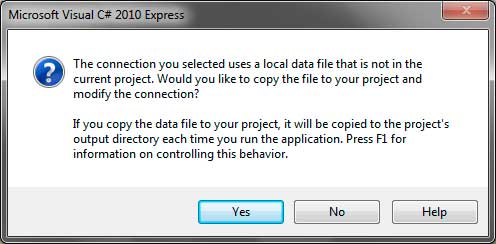
Visual Studio will prompt you whether to copy the Northwind.mdf database file since it will detect that it is located outside your project folder. Clicking Yes will copy the Northwind.mdf file from the origincal location to your project folder. Also note that everytime you run your program, the database file will also be copied to the output directory. You will learn later how to modify this behavior.
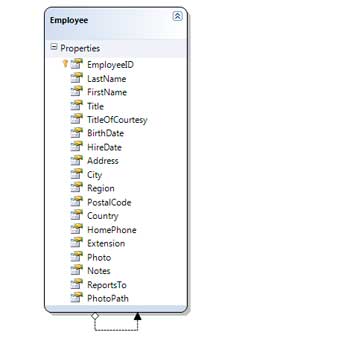
After clicking Yes, The Object Relational Designer will now show a class diagram representing a generated class that will hold values of each row in the Employees table. The name of the class is a singularized version of the Table’s name. A property with an appropriate type is created for every column in the dragged table. You will see these properties in the Object Relational Designer. If a property conflicts with the name of the class, then it will be numbered. For example, if the class’ name is Employee and it has a column named Employeeas well, then the column’s corresponding property will be named Employee1.
As soon as you drag a table to the Object Relational Designer, the DataContext class for the coresponding database will be created. Since we used the Northwind database, the generated DataContext class will be named NorthwindDataContext. Clicking a blank space in the Object Relational Designer will allow you to edit the properties of the DataContext class using the Properties Window. You can also change the properties of the created row class and properties of its members. But leaving the default names and settings for the classes is recommended.
If you are curious about the generated classes and wan’t to take a look at its implementation, go to Solution Explorer and expand the node for the created DBML file. You will be presented with two files. Double click the one with .designer.cs extension. You will then see how the classes for your tables and DataContext was defined. You should always save the DBML file before using it in your application.
Using LINQ to SQL Classes
Once the required LINQ to SQL classes have been successfully generated, we can now use them in our application. For our GUI, we will be using a DataGridView control to display the queried records. Head back to the Windows Forms Designer. Drag a DataGridView control from the Toolbox’s Data cetegory to the form. Set the DataGridView‘s Dock property to Fill so it will take up all the space of the form. Then resize the form to a larger size so it will properly show all the records that we will query.
We will be using the following code:
using System;
using System.Linq;
using System.Windows.Forms;

namespace LinqToSqlDemo
{
    public partial class Form1 : Form
    {
        public Form1()
        {
            InitializeComponent();
        }

        private void Form1_Load(object sender, EventArgs e)
        {
            NorthwindDataContext database = new NorthwindDataContext();

            var employees = from employee in database.Employees
            select new
            {
            employee.EmployeeID,
            employee.FirstName,
            employee.LastName,
            employee.BirthDate,
            employee.Address,
            employee.Country
            };

            dataGridView1.DataSource = employees;
        }
    }
}
Double click the Form’s title bar in the Designer to generate a handler for the form’s Load event. Add the codes in lines 16-29. The code at line 16 creates a new NorthwindDataContext object. This will be used to access the tables of the database and the rows each table contain. Lines 18-27 uses a LINQ query which access the NorthwindDataContext‘s Employees property containing each record for employee. The select clause of the query only selects some of the properties of every employee. Line 29 uses the DataGridView‘s DataSource property and assigns the result of the query as it’s data source.
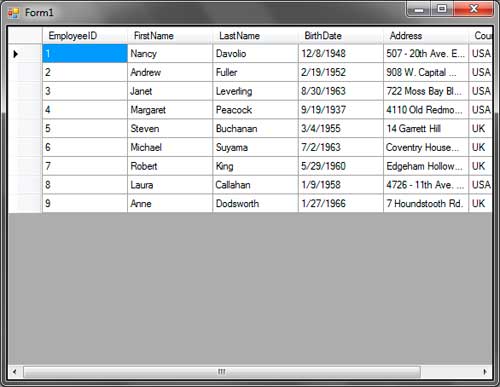
When you run the program, you will see all the records from the Employees table.
You can provide controls, for example, a combo box containing different countries, and modify the query based on the selected country in the combo box. For more LINQ techniques, you can review the lessons for the basics of LINQ querying.