RadioButton Control
The RadioButton control (System.Windows.Forms.RadioButton) is a button that can be either turned on or off. The radio button is a circular button with a label. You simply click a radio button to change it from off to on or vice versa. When the radio button is turned on, a dot can be seen and when it is turned off, the circle appears empty. Radio buttons are usually used when a user must select one choice from a set of choices. For example, if you want to determine the gender of the user, then you can use two radio buttons labeled Male and Female. Since you used a radio button, you can only choose one of the two. The following are some properties of the radio button control.
| Property | Description |
|---|---|
| Appearance | The radio button can be displayed as a normal button, or a circular button with a label beside it. |
| CheckAlign | Determines the alignment of the button. The default is MiddleLeft, which will show the button to the left of the label. |
| Checked | When set to true, the radio button will be in its “ON” state and a dot will be seen inside the button. |
| Text | Sets the text inside the label of the radio button. |
The radio button has a CheckChanged and Click event. The CheckChanged event is sent when the state of the button is changed. For example if the radio button turns from off to on, then the CheckChanged event will execute. The Click event is sent when the radio button is clicked. By default, clicking a radio button will change its state, which will therefore, trigger the CheckChanged event. The difference of the Click event is that you can actually change this default behavior of the radio button. There is a property for the radio button control called AutoCheck which if set to false, clicking the radio button will not change its state, but will send a Click event and through code, you can manually set the radio button’s Checked property to true. The default event for the radio button is the CheckChanged event, therefore, double clicking a radio button while in the VS/VCE forms designer will generate an event handler for the said event. The following example demonstrates the use of the radio button.
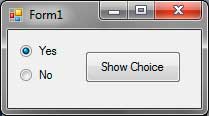
Drag two radio buttons to the form. Name them radioButtonYes and radioButtonNo. Drag a button control, name it buttonShow, and set its text to Show Message.

Double click the buttonShow to generate a handler for its Click event. Write the highlighted code inside the event handler.
private void buttonShow_Click(object sender, EventArgs e)
{
    if (radioButtonYes.Checked)
        MessageBox.Show("You choosed yes!");
    else
        MessageBox.Show("You choosed no!");
}
When you click the button, the program will determine which radio button is checked. You can do this by using the Checked property. We used an if statement to determine whether the radio button is checked (on). If it’s not, then the other radio button is checked since there are only two radio buttons in the form and at least one of them is always checked.