Simple Student Enrollment System
We will create a Simple Enrollment System that allows you to search for a student in the database using a specified StudentID. It will also allow you to add or remove a student from the database or update his/her student information. This lesson will use the disconnected approach for querying, inserting, removing, and updating records.
Create a new windows forms application and create a user interface similar to the one shown in Figure 1.
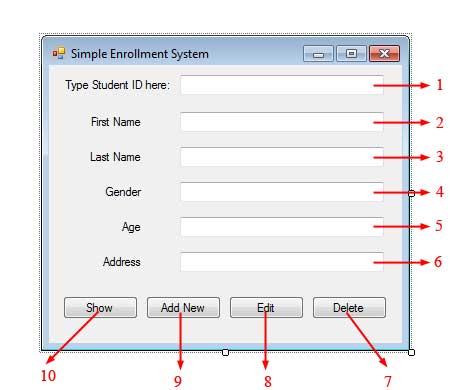
Figure 1
| Label | Name | Properties |
|---|---|---|
| 1 | textBoxStudentId | |
| 2 | textBoxFirstName | Enabled: False |
| 3 | textBoxLastName | Enabled: False |
| 4 | textBoxGender | Enabled: False |
| 5 | textBoxAge | Enabled: False |
| 6 | textBoxAddress | Enabled: False |
| 7 | buttonDelete | Text: Delete |
| 8 | buttonEdit | Text: Edit |
| 9 | buttonAddNew | Text: Add New |
| 10 | buttonShow | Text: Show |
Figure 2
Go to the Code Editor by pressing F7 and be sure to first import the two necessary namespaces for this database connection.
using System.Data;
using System.Data.SqlClient;
Add the following private fields into the Form1 class:
private SqlConnection connection;
private SqlCommand command;
private SqlDataAdapter adapter;
private SqlCommandBuilder builder;
private DataSet dataSet;
bool updateReady = false;
bool insertReady = false;
We proclaimed the fields that will be utilized for associating and issuing directions to the database. We pronounced them as class fields rather than as nearby factors so they will be shared by all database activities (For example, no compelling reason to announce Connection objects for questioning and another for embeddings records). The updateReady and inserReady field will be utilized later to update and inserting new student. On the Form’s constructor include the codes in lines 5-11.
public Form1()
{
    InitializeComponent();

    connection = new SqlConnection();
    connection.ConnectionString = @"Data Source=.\SQLEXPRESS;" +
        "Initial Catalog=University;Integrated Security=SSPI";

    command = connection.CreateCommand();
    adapter = new SqlDataAdapter(command);
    builder = new SqlCommandBuilder(adapter);
    dataSet = new DataSet();
}
Example 1
Line 5 initializes our Connection object. Line 6 specifies the connection string that will be used for the connection. Line 9 creates the command using the DbCommand.CreateCommand() method which returns a Command object that is already assigned to the Connection object that called that method. Line 10 makes a DataAdapter object and we passed the Command object that will be utilized as the SelectCommand inside its constructor. Line 11 passes the created DataAdapter in the constructor of the CommandBuilder object which will be utilized to produce SQL directions when the Update() method is called later. At long last, line 12 makes a DataSet() object which will contain the result sets acquired from the database. The program until further notice can just do queries to the database by composing the StudentId in textBoxStudentId and clicking the buttonShow. The code for the Click event of buttonShow is as pursues:
private void buttonShow_Click(object sender, EventArgs e)
{
    command.CommandText = "SELECT * FROM Students WHERE [email protected]";
    command.Parameters.Clear();
    command.Parameters.AddWithValue("@StudentID", textBoxStudentID.Text);

    dataSet.Tables.Clear();

    int result = adapter.Fill(dataSet, "Students");

    if (result > 0)
    {
        DataRow student = dataSet.Tables["Students"].Rows[0];
        textBoxFirstName.Text = student["FirstName"].ToString();
        textBoxLastName.Text = student["LastName"].ToString();
        textBoxGender.Text = student["Gender"].ToString();
        textBoxAge.Text = student["Age"].ToString();
        textBoxAddress.Text = student["Address"].ToString();
    }
    else
    {
        ClearFields();
        MessageBox.Show("Student does not exist.");
    }
}
Example 2
Since we declared our Connection and Command objects as class fields, we can simply change the properties of them depending on the operation to be made. Line 3 changes the CommandText property of our Command object to a SELECT statement the retrieves everything from the Students table that has a StudentID specified. The command text has one direction parameter for StudentID which will be supplanted by the esteem composed by the client in textBoxStudentID as appeared in line 5. Note that before that, we cleared the Parameters property first because it might already contain some values from other operation. We do that utilizing the Clear() method (line 4). Line 7 clears the Tables collection property of the dataset in case there are already tables stored in it. Line 9 calls the DbDataAdapter.Fill()method to query the student from the database table and add it to a table named “Students” in the dataSet. The Fill() method will return the number of lines or result sets returned and we are expecting somewhere around 1 so line 11 tests if the value returned, is more prominent than 0. If so line 13 first stores the first row of the Students table in the dataSet into a DataRow object for easier typing and readability although it is optional. Lines 14-18 demonstrates the estimations of individual sections of the recovered understudy row into their separate text boxes. Lines 20-24 are codes to be executed if no student with the predefined student number is returned or found.
Next in the list is the buttonAddNew which is responsible for adding or “enrolling” new students to the database. The following is the event handler for the buttonAddNew’s Click occasion.
private void buttonAddNew_Click(object sender, EventArgs e)
{
    if (!insertReady)
    {
        buttonAddNew.Text = "Enroll";
        ClearFields();
        textBoxStudentID.Text = GetNextStudentID().ToString();

        textBoxStudentID.Enabled = false;
        textBoxFirstName.Enabled = true;
        textBoxLastName.Enabled = true;
        textBoxGender.Enabled = true;
        textBoxAge.Enabled = true;
        textBoxAddress.Enabled = true;
        buttonShow.Enabled = false;
        buttonEdit.Enabled = false;
        buttonDelete.Enabled = false;
        insertReady = true;
    }
    else
    {
        buttonAddNew.Text = "Add New";

        command.CommandText = "SELECT * FROM Students";
        dataSet.Tables.Clear();
        adapter.Fill(dataSet, "Students");

        DataRow row = dataSet.Tables["Students"].NewRow();
        row["FirstName"] = textBoxFirstName.Text;
        row["LastName"] = textBoxLastName.Text;
        row["Gender"] = textBoxGender.Text;
        row["Age"] = textBoxAge.Text;
        row["Address"] = textBoxAddress.Text;

        dataSet.Tables["Students"].Rows.Add(row);

        try
        {
            int result = adapter.Update(dataSet, "Students");

            if (result > 0)
                MessageBox.Show("Student successfully enrolled.");
            else
                MessageBox.Show("Failed to enroll student.");
        }
        catch (SqlException ex)
        {
            MessageBox.Show(ex.Message);
        }

        textBoxStudentID.Enabled = true;
        textBoxFirstName.Enabled = false;
        textBoxLastName.Enabled = false;
        textBoxGender.Enabled = false;
        textBoxAge.Enabled = false;
        textBoxAddress.Enabled = false;
        buttonShow.Enabled = true;
        buttonEdit.Enabled = true;
        buttonDelete.Enabled = true;
        insertReady = false;
    }
}
Example 3
The buttonAddNew will fill in as a toggle button. The insertReady field will decide the activity that this button will perform. Since insertReady is at first false, lines 5-18 will be executed. Line 5 changes the text of the button to “Select” basically to advise the client that this button ought to be clicked once the subtle elements are entered. Line 6 considers a technique that will clear every one of the fields if so it will be prepared to acknowledge new points of interest from the client. The definition for the ClearFields() method is as per the following:
private void ClearFields()
{
    textBoxFirstName.Text = String.Empty;
    textBoxLastName.Text = String.Empty;
    textBoxGender.Text = String.Empty;
    textBoxAge.Text = String.Empty;
    textBoxAddress.Text = String.Empty;
}
Example 4
Since we need will be adding a new student, we need to generate the next unique StudentID. We can’t just sort another student ID on the grounds that a similar student ID may as of now be in the database. That’s why line 7 calls another utility method called GetNextStudentID(). The definition for this method is as follows:
private int GetNextStudentID()
{
    command.CommandText = "SELECT IDENT_CURRENT('Students') + IDENT_INCR('Students')";

    try
    {
        connection.Open();
        int nextID = Convert.ToInt32(command.ExecuteScalar());
        return nextID;
    }
    catch (SqlException ex)
    {
        MessageBox.Show(ex.Message);
    }
    finally
    {
        connection.Close();
    }
    return 0;
}
Example 5
Line 3 makes a SQL Server direction that will get the following Identity field value. Keep in mind that the StudentID field of the Students table is an Identity field which auto increases when new records are included. The thing is, we can’t simply get the last StudentID and add 1 because SQL server saves the last Identity value used so if we delete a record with StudentID 5, making the new last StudentIDis 4, the next StudentID that will be generated will be 6. There is an SQL Server function called IDENT_CURRENT() which returns the current identity field and IDENT_INCR() which returns the increment value of the identity field. We passed the name of the table to these limits and added their arrival values to get the latest StudentID. We open the connection in line 7 and line 8 uses the DbCommand.ExecuteScalar() since we are expecting a single value (not record) to be returned. The value is the produced last StudentID but we have to change over it first to the number. Finally, were returned that value to the caller of the method (line 9). Note that this method utilized the associated methodology for acquiring a single value. You can likewise recover the value utilizing the detached way.
Back to the code in Example 3, after getting a new StudentID, we simply display it using textBoxStudentID. Lines 9-14 enables the text boxes so the user can enter the details for the new student and lines 15-17 disables buttonShow, buttonInsert, and buttonDelete so the user can only click the “Enroll” button. Finally, line 18 changes the value of insertReady to true so the next time the user clicks this button lines 22-60 will be executed instead.
The first time the user clicks the buttonAddNew, the program is now ready to accept the information for the new student. After the user types the information for each field, the user should now then click the buttonAddNew again to execute the SQL INSERT command to the database. Let’s now discuss lines 22-63 of Example 3 which does the actual communication to the database. Line 22 reverts back the label of the button to “Add New”. Lines 24 changes the CommandText property of our Command object into a SELECT Statement that queries all records from the database. Line 25 resets the Tables property to remove any tables that might be there. Line twenty-six Fills the dataSet with all the records from the database table. Line 28 uses the DataTable.NewRow() method to create a DataRow with the same number of columns and type as the Row found in the Students table of the dataSet. If you will not use NewRow(), then you will need to manually create each column which would be tedious. Lines 29-33 simply assigns the values in the text box to each column of the new row to be added. Line 35 adds the new row to the Rows collection of the Students table of the dataSet.Now all that is left is to submit the changes to the database. Inside a try block, we called the DbAdapter.Update() method and passed the dataSet and the name of the DataTable that contains the updated results. By calling this method, the corresponding INSERT statement is generated by CommandBuilder and then it is executed to the database. It returns a whole number which demonstrates the number of lines that were effectively refreshed. We check its values in line forty-one to determine if the insertion is successful. Lines 51-52 reverts the textboxes and the buttons to their previous states and we switch back the insertReady flag to false.
The buttonEdit also acts as a toggle button and most of the code is similar to the code of buttonAddNew.
private void buttonEdit_Click(object sender, EventArgs e)
{
    if (!updateReady)
    {
        buttonEdit.Text = "Update";
        textBoxStudentID.Enabled = false;
        textBoxFirstName.Enabled = true;
        textBoxLastName.Enabled = true;
        textBoxGender.Enabled = true;
        textBoxAge.Enabled = true;
        textBoxAddress.Enabled = true;
        buttonShow.Enabled = false;
        buttonAddNew.Enabled = false;
        buttonDelete.Enabled = false;
        updateReady = true;
    }
    else
    {
        buttonEdit.Text = "Edit";

        command.CommandText = "SELECT * FROM Students";
        dataSet.Tables.Clear();
        adapter.Fill(dataSet, "Students");

        foreach (DataRow student in dataSet.Tables["Students"].Rows)
        {
            if (student["StudentID"].ToString() == textBoxStudentID.Text)
            {
                student["FirstName"] = textBoxFirstName.Text;
                student["LastName"] = textBoxLastName.Text;
                student["Gender"] = textBoxGender.Text;
                student["Age"] = textBoxAge.Text;
                student["Address"] = textBoxAddress.Text;
            }
        }

        try
        {
            int result = adapter.Update(dataSet, "Students");

            if (result > 0)
                MessageBox.Show("Update successful.");
            else
                MessageBox.Show("Failed to update.");
        }
        catch (SqlException ex)
        {
            MessageBox.Show(ex.Message);
        }

        textBoxStudentID.Enabled = true;
        textBoxFirstName.Enabled = false;
        textBoxLastName.Enabled = false;
        textBoxGender.Enabled = false;
        textBoxAge.Enabled = false;
        textBoxAddress.Enabled = false;
        buttonShow.Enabled = true;
        buttonAddNew.Enabled = true;
        buttonDelete.Enabled = true;
        updateReady = false;
    }
}
Example 6
Clicking the buttonEdit for the first run through will enable the text boxes and handicap the buttons with the exception of the buttonEdit itself. We utilized the updateReady field to make the button toggle its usefulness.After the changes has been made to the current student, clicking the button the second time will send the changes to the database. Lines 25-35 searches the student with the StudentID indicated in the textBoxStudentID. We did this utilizing a foreach circle and we retrieve each line from the Students table of the dataSet.If the current retrieve row has a StudentID equal to the one in the textbox, then we update every field to whatever new value typed by the user in the text boxes.
Finally, the buttonDelete‘s Click event handler is shown in Example 7.
private void buttonDelete_Click(object sender, EventArgs e)
{
    command.CommandText = "SELECT * FROM Students";
    dataSet.Tables.Clear();
    adapter.Fill(dataSet, "Students");


    foreach (DataRow student in dataSet.Tables["Students"].Rows)
    {
        if (student["StudentID"].ToString() == textBoxStudentID.Text)
        {
            student.Delete();
            break;
        }
    }

    try
    {
        int result = adapter.Update(dataSet, "Students");

        if (result > 0)
            MessageBox.Show("Student successfully deleted.");
        else
            MessageBox.Show("Failed to delete student.");
    }
    catch (SqlException ex)
    {
        MessageBox.Show(ex.Message);
    }

    command.CommandText = "SELECT * FROM Students";
    adapter.Fill(dataSet, "Students");
}
Example 7
The code for deleting a row is similar to updating in which we simply used a foreach loop to find the student to delete. If the row has a StudentID equal to the one indicated in the textBoxStudentID, then line 12 deletes that row using the Delete() method. We at that point leave the loop by utilizing the break explanation.
Our simple enrollment system is now complete. To test it, run the program and type an existing StudentID in the first text box. Click the show button to see the student’s information. If you want to edit that information, you can click the buttonEdit, type the new values, and click buttonEdit again to save the changes. You can likewise erase that student by clicking buttonDelete. To include or select another student, tap the buttonAddNew and type the data of the new student into the fields. Snap the buttonAddNew once more to include the student into the Students database table.