User Controls
You can create your own controls if you don’t find what you want from the list of predefined controls available in .NET. You may need to create your own control because the controls that are already available for you are very general and you might need a control which will have a specific feature. These custom controls can then be placed in the toolbar together with other controls.
There are two types of user defined controls, user controls and custom controls. User control is composed of preexisting controls and is very easy to create. Custom controls are created from scratch, therefore, you need to define a lot of functionalities and how the custom control will render. We will focus on user controls because custom controls require advanced concepts not fit for an introductory topic.
User controls inherit from the UserControl class which is a derived class of the Control class that other control uses. You won’t have access to the properties and methods of the components that you will include in a user control because only properties and methods of the UserControl class is exposed to you. But you can define properties and methods that will communicate to the components of the user control.
We will be creating an EditableLabel control. It will exactly look at a label but when the user double-clicks it, it will transform into an editable textbox containing the current text of the label. You can then edit its contents and when the user presses enter, it will transform back into a label containing the edited text.
Open Visual Studio and create a new project. From the list of templates, choose Windows Forms Control Library and name it EditableLabel. (If you are using Visual Studio Express, choose Class Library instead if you don’t find Windows Forms Control template. You can then add a user control from the Project menu).

You will be presented with a blank canvas as seen below:

Figure 2
It looks just like a Windows Forms, but it has no frame. This is because you are designing a user control.Any management you place within it’ll be a part of the user management. Click the canvas and alter its Name property to EditableLabel and its AutoSize property to True.Drag a label to the canvas and change its Text property to Label and its Name property to labelDisplay. Resize the canvas so that it fits the label inside it.
![]()
Figure 3
Adding Properties
Since we are creating a user control, then it will only contain properties and events that the UserControl class offers. It means there is no way for the user to access the properties of the Label control we have added to the form. Although the UserControl class has a Text property which it inherits from Control, we need a more tailored functionality involving the text inside our label. To add a property to a user control, we simply need to add a property to the class of our user control. While in Design View, press F7 to go to the Code Editor. Inside the EditableLabel class, add the following property:
[Browsable(true)]
[DesignerSerializationVisibility(DesignerSerializationVisibility.Visible)]
public override string Text
{
    get { return labelDisplay.Text; }
    set { labelDisplay.Text = value; }
}
You might notice two attributes at the top of the property. The Browsable attribute allows a property to be shown in the Properties Window of Visual Studio. If you don’t add this attribute (and set it to true), then you can only access the property in code and not in design time. The second attribute allows us to change the property of the user control by using the property found inside the Property Window. Note that we also used the override keyword because the Text property already exists in the User Control.
Adding Event Handlers
Now it’s time to add an event handler to our user control. Review that our EditableLabel control got to turn out to be a textbox once the consumer double faucets it. Therefore, we want to feature an occasion handler to its DoubleClick event. Since we tend to solely have one management within the canvas, then choose the label. Then attend the Event section of the Properties Window and realize the DoubleClick property and double click it. which will produce a replacement event handler for the DoubleClick property.

Figure 4
We need to add a TextBox control to our user control. Include the accompanying field inside the EditableLabel class.
private TextBox editableTextBox;Presently inside the constructor of the EditableLabel and after the call to InitializeComponent method, include the highlighted code:
public EditableLabel()
{
    InitializeComponent();

    editableTextBox = new TextBox();
    this.Controls.Add(editableTextBox);
    editableTextBox.Hide();
}
We instantiate our text box and added it to the Controls collection of the user control. Since we want the label to be shown first and not the text box, we hide it using the Hide method of the text box.
Now let’s go back to the event handler for the DoubleClick event of the label.
private void labelDisplay_DoubleClick(object sender, EventArgs e)
{
    editableTextBox.Size = this.Size;
    editableTextBox.Text = labelDisplay.Text;
    labelDisplay.Hide();
    editableTextBox.Show();
    editableTextBox.Focus();
}
The above code is the event handler for the DoubleClick event of the label inside our user control. We set the size of the text box to the size of our user control. We then set its text to whatever the text of the label is. Next, we hide the label using the Hide method. Finally, we show the text box and put the focus to it so the user can start editing it.
Now we need to add another event handler that will allow a user to commit the changes to the text of the label after editing. Inside the constructor of EditableLabel class, insert the following highlighted code:
public EditableLabel()
{
    InitializeComponent();

    editableTextBox = new TextBox();
    this.Controls.Add(editableTextBox);
    editableTextBox.KeyDown += new KeyEventHandler(editableTextBox_KeyDown);
    editableTextBox.Hide();
}
We added an event handler for the textbox’s KeyDown event. When the user is finish editing the text, he or she can simply press the Enter or Return key. Here is the definition for the event handler of the KeyDown event:
void editableTextBox_KeyDown(object sender, KeyEventArgs e)
{
    if (e.KeyCode == Keys.Enter)
    {
        labelDisplay.Text = editableTextBox.Text;
        editableTextBox.Hide();
        labelDisplay.Show();
    }
}
First we checked if the key pressed by the user is the Enter key. Next, we set the Text of the currently hidden label into the new text entered by the user. We at that point shroud the editableTextBox and reshow the labelDisplay containing the refreshed content.
Finally, when the label is resized depending on the length of the text, we also need to resize the actual user control. Click labelDisplay in the Designer and in the Properties WIndow’s Events section, find the Resize event and double click it. Use the following event handler for it.
private void labelDisplay_Resize(object sender, EventArgs e)
{
    this.Size = labelDisplay.Size;
}
The occasion handler basically sets the Size of the client control to the new Size of the labelDisplay.
Compiling the User Control
We are presently prepared to aggregate our EditableLabel client control. To do that simply go to the menu and pick Build and after that Build Solution. The ordering will make a record with a .dll expansion which contains your client control.
Testdriving Our User Control
To test our brand new user control, we need to create another project. Right click the solution inside the Solution Explorer and then choose New > Project.

Figure 5
In the Add New Project Window, choose Windows Forms Application and name it EditableLabelDemo. We need to import our control to the Toolbox so we can easily drag it to the form. Once you are presented with a blank windows forms, go to the Toolbox and right click (You can right click on the Generals tab to add our control there). Select the option “Choose Items…”.

Figure 6
In the Choose Toolbox Items Window, click the Browse button. We need to browse for the .dll file containing our user control. Browse for the directory where your project was saved. Go inside the folder of our Windows Control Library project (named EditorLabel) and inside it, enter the bin folder. The dll file could either be in the Debug or Release folder. Once you found the EditorLabel.dll, select it and click Open. EditorLabel will now show up in the list of selectable controls inside the Choose Toolbox Item Window. Be sure its checked and then click OK. Now you will be able to see our user control inside the Toolbox.
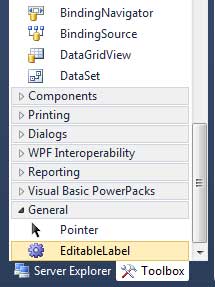
Figure 7
Drag an EditableLabel to the form. You can also find the Text property in the Properties Window since we added the Browsableattribute to that property.
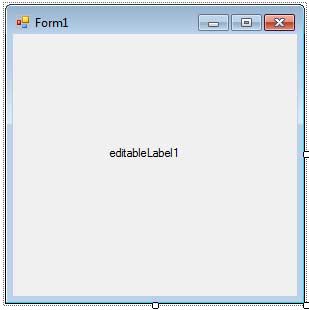
Figure 8
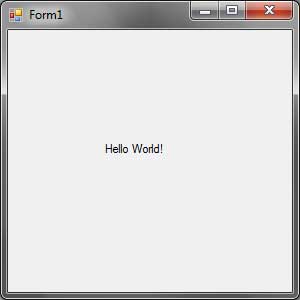
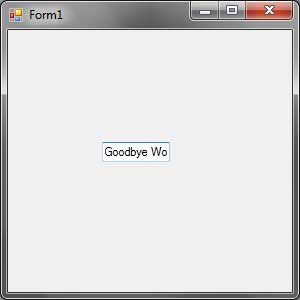
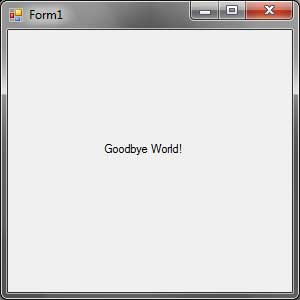
Before we hit F5 to run the project, we must first make EditableLabelDemo project as startup project. Right click EditableLabelDemo project in the Solution Explorer and choose Set as StartUp Project. It will make the name of the startup project bold. Run the project and double click the label. Change the text to whatever you want and press Enter. Watch as the text of the label updated to whatever you typed in the editable textbox.