Inserting Records: Disconnected Approach
Inserting records utilizing the disengaged methodology is a little unique contrasted with doing it utilizing the associated methodology. We have to utilize the DataAdapter and the DataSet classes.When modifying records using the disconnected approach, what we modify is the contents of the DataTable, then after the modification, we submit the changes to the database. So if we want to insert new records, then we add a DataRow in the Rows property of the DataTable. After that, we invoke the Update() method which will submit the inserted row to the actual database table. The INSERT command used for it is generated by a CommandBuilder object which is available for each data provider. For example, for SQL provider, you can use the SqlCommandBuilder class. The following are the fundamental strides for embeddings a record utilizing the detached methodology.
- Create a Connection
- Create a Command
- Create a DataAdapter
- Create a CommandBuilder and associate it to the DataAdapter
- Create a DataSet
- Specify connection string for the connection
- Specify Connection to be used by the Command
- Specify CommandText for the Command
- Add values to command parameters if any
- Specify the SelectCommand for the DataAdapter
- Fill the DataSet with the result set from the database table
- Create a new DataRow object
- Assign values for each of its field
- Add the DataRow object to the specified DataTable of the DataRow
- Send the changes to the database
We need to retrieve the contents of a database table that we want to add a record. That is the reason despite everything we have to indicate the SelectCommand for the DataAdapter. After that, we can make any changes to the DataTable containing the results. We can add a new DataRow representing the new record in its Rows property. To demonstrate the steps above, create a new Windows Forms Application and name it InsertingRecordsDisconnected. Add labels and text boxes for FirstName, LastName, Gender, Age, and Address fields. Name the textboxes firstNameTextBox, lastNameTextBox, genderTextBox, ageTextBox, and addressTextBox. Also add a button and name it addButton.
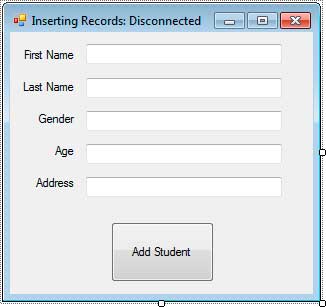
Figure 1
Double-click the button to produce an event handler for its Click event. Import the System.Data and System.Data.SqlClient. Utilize the accompanying code for the handler.
private void addButton_Click(object sender, EventArgs e)
{
    SqlConnection connection = new SqlConnection();
    SqlCommand command = new SqlCommand();
    SqlDataAdapter adapter = new SqlDataAdapter();
    SqlCommandBuilder builder = new SqlCommandBuilder(adapter);
    DataSet dataset = new DataSet();

    connection.ConnectionString = @"Data Source=.SQLEXPRESS;" +
        "Initial Catalog=University;Integrated Security=SSPI";
    command.Connection = connection;
    command.CommandText = "SELECT * FROM Students";
    adapter.SelectCommand = command;
    adapter.Fill(dataset, "Students");

    DataRow row = dataset.Tables["Students"].NewRow();
    row["FirstName"] = firstNameTextBox.Text;
    row["LastName"] = lastNameTextBox.Text;
    row["Gender"] = genderTextBox.Text;
    row["Age"] = Int32.Parse(ageTextBox.Text);
    row["Address"] = addressTextBox.Text;

    dataset.Tables["Students"].Rows.Add(row);

    try
    {
        int result = adapter.Update(dataset, "Students");

        if (result > 0)
            MessageBox.Show("Success!");
        else
            MessageBox.Show("Failed!");
    }
    catch (SqlException ex)
    {
        MessageBox.Show(ex.Message);
    }
}
Example 2
We created the necessary objects in lines 3-7. Note the create of SqlCommandBuilder in line 6. In its constructor, we pass the created DataAdapter object to associate the CommandBuilder to it. Lines 12-14 fills the DataSet of values from the Student table and adds the outcome to the DataTable named Students inside the DataSet. Now that we have the values of the table from the database, we can now insert values to that DataTable. Line 16 create a new DataRow object which represents to the row of a DataTable. We indicate which Table the column will be included and utilized the DataTable’s NewRow() method. Doing this instead of initializing a DataRow using a constructor saves automatically provides the necessary columns for the DataRow together with their associated column names. Lines 17-21 accesses each column using the DataRow‘s indexer that accepts the name of the column. We alloted every one of the estimations of each text box. In line 23, we added the row to the Rows property of the DataTable that contains the records. We have now modified the DataTable because we added a new record, but the record is only added to the DataTable, not the actual database table.
Line 27 calls the DataAdapter’s Update() method and we passed the DataSet and the name of the DataTable.When Update() is called, the CommandBuilder generates the required SQL statements for every change or modification it detects. Those SQL commands are then executed to the database. In our case, since we added a new row to the DataTable, CommandBuilder generates an INSERTStatement together with parameters filled with the values you specified. After the execution of the command, the values is then added to the actual database table. The Update() method returns an integer value representing the number of rows affected. Since we inserted 1 row, then we are expecting a return value of 1. We test if the outcome is more prominent than 0 in line 29. If it is, then we show a success message. Otherwise, we tell the user that the insertion has failed. Execute the program and give an incentive to be added to the database table.
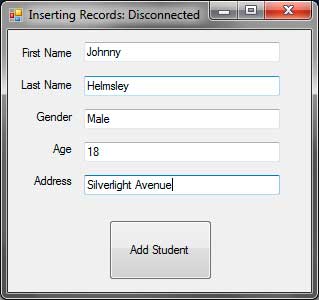
Clicking the Add Student button will add the values to the DataTable and the progressions will be sent to the database where another row will be added to the genuine database table.