Creating a Simple Program
Let’s produce our 1st program mistreatment the C# artificial language. The program can print a line of text during a console window. Note that we are going to be mistreatment Console Application because the project sort for the subsequent tutorials. this can be simply an outline of what you may learn within the following lessons. i’ll make a case for here the structure and syntax of a straightforward Simple C# program.
Open up Visual Studio. Go to File > New Project to open the New Project Window. You will be presented with a window asking you of the type and name of the project you want to create.
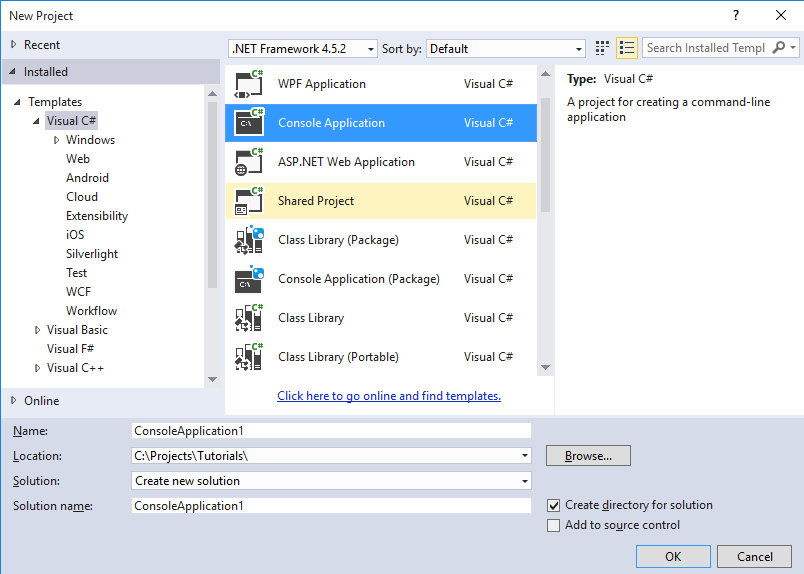
Choose Console Application as the project type and name it MyFirstProgram. A Console Application is a program that runs in command prompt(console) and has no visual or graphical interface. We will deal with this type of project because it will be easier to demonstrate the programming language features. After pressing OK, Visual Studio will create a solution file in a temporary directory. A solution is a collection of projects. The solution file with file extension .sln contains details about the projects and files associated with it and many more. For most of our tutorials, a solution will only contain 1 project. Creating a new project creates a .csproj file which contains details about the project and its associated files. In our example, our solution contains one console application project.
Since we choose Console Application as the project type, we are presented with the Code Editor.
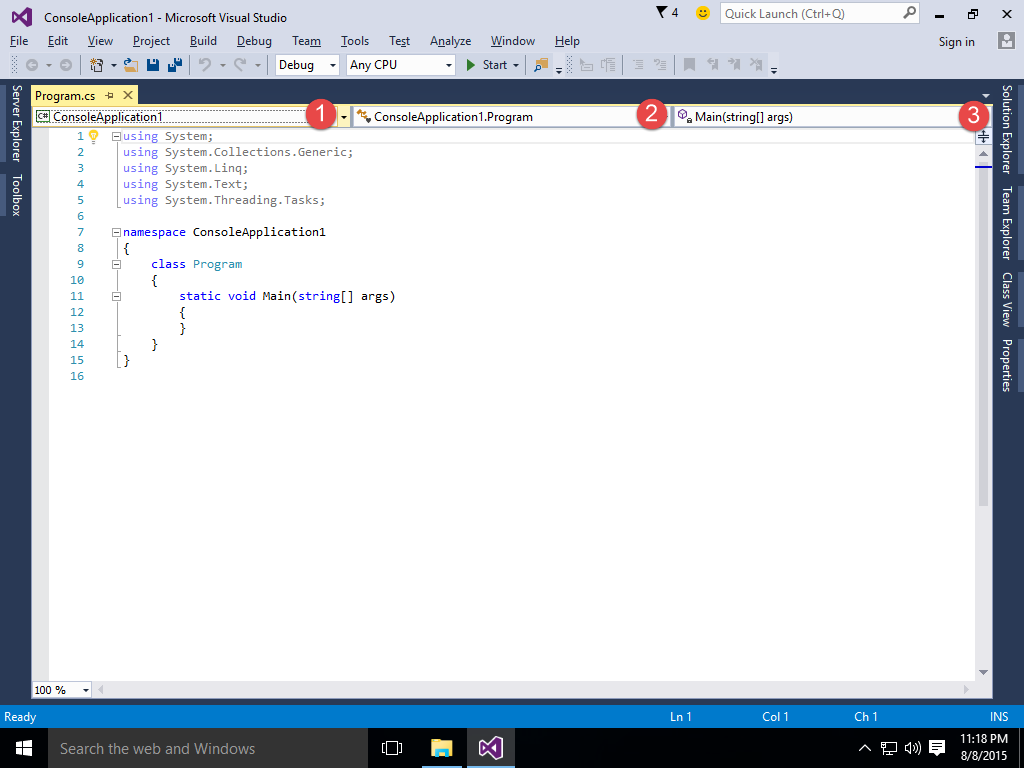
The Code Editor is where you type your codes. Codes typed in the editor are color coded (syntax-highlighted) so it will be easier for you to recognize certain parts of your code. Color Coding is another great feature of the Visual Studio family. There are three combo boxes to the top of the code editor which allows you to easily navigate your code in the solution. The first combo box (1) allows you to select which project you want to navigate to. The second combo box (2) will list all the different components of the code and the combo box on the top right (3) will list all the members of the class, structure, or enumeration where the cursor is positioned inside. Don’t worry about the terms I used, they will be discussed in later lessons.
A .cs file named Program.cs is created and is included to the project. It will contain the codes for your program. All C# code files has .cs file extensions. You will be presented with a prewritten code to get you started, but for now, delete everything and replace it with the following code: Simple Program in C#
namespace MyFirstProgram
{
    class Program
    {
        static void Main()
        {
            System.Console.WriteLine("Welcome to Visual C# Tutorials!");
        }
     }
}
The numbers on the left side are not part of the actual code. They are only there so it will be easier to reference which code is being discussed by simply telling the line numbers. In Visual Studio you can go to Tools > Options > Text Editor > C# and then check the Line Numbers check box to show line numbers in your Visual Studio’s code editor. Note that the line numbers in your code editor may not be aligned with the line numbers in the examples.
Structure of a C# Program
The code in Example one is that the simplest program you’ll be able to create in C#. It’s purpose is to show a message to the console screen. each language has its own basic syntax, that ar rules to follow once writing your code. Let’s attempt to justify what every line of code will.
Line one is a namespace declaration, that declares a namespace used as containers for your codes and for avoiding name collisions. Namespaces are going to be lined thoroughly in another lesson. Right now, the namespace represents the name of your project. Line 2 is an open curly brace ( { ). Curly braces define a code block. C# may be a block-structured language and every block will contain statements or a lot of valid code blocks. Note that each opening curly brace ( { ) should have a matching closing brace ( } ) at the end.Everything within the wavy braces in Line a pair of and ten is that the code block or body of the namespace.
Line 3 declares a new class. Classes square measure a subject of object-oriented programming and you may learn everything concerning it in later lessons. For now, the codes you write should be contained inside a class. You can see that it conjointly has its own combine of curly braces (Line four and 9), and everything between them is that the class’ code block.
Line five is named the Main method. a technique encapsulates a code so executes it once the strategy is named. Details in making a technique are explained in an exceedingly later lesson. the most technique is that the place to begin of the program. It implies that it’s the entry purpose of execution and everything within the most technique square measure the primary ones to execute on balance the initializations are completed. image the most technique because the exterior door of your house. you may learn additional regarding the most technique in an exceedingly later lesson. the most technique and different ways you may produce additionally includes a set of kinky braces that defines its code block and within it square measure the statements which will be dead once the strategy is named.
Statements are commands or operations. every statement should finish with a punctuation mark (;). Forgetting to feature the punctuation mark can lead to a software error. Statements ar situated within code blocks. AN example of a press release is that the following code (Line 7):
System.Console.WriteLine("Welcome to Visual C# Tutorials!");This is the code that displays the message “Welcome to Visual C# Tutorials!”. we’d like to use the WriteLine() method and pass the string message within it. A string or string literal is a group of characters and they are enclosed in double quotes (“). A character is any letter, number, symbol, or punctuation. For now, the whole line simply means “Use the WriteLine method located in the Consoleclass which is located in the System namespace”.
More of those are explained within the forthcoming lessons.
C# ignores areas and new lines. Therefore, you’ll be able to write an equivalent program in Example one in precisely one line. however that may create your code extraordinarily laborious to scan and rectify. Also, statements will span multiple lines as long as you terminate the last line with a punctuation mark. One common error in programming is adding semicolons at every end of a line though multiple lines represent one statement. take under consideration the following example.
System.Console.WriteLine(
"Welcome to Visual C# Tutorials!");
Since C# ignores white area, the on top of snipping is suitable. however the subsequent isn’t.
System.Console.WriteLine( ;
"Welcome to Visual C# Tutorials!");
Notice the punctuation at the top of 1st line. this can manufacture a systax error as a result of the 2 lines of code ar thought of collectively statement and you merely add a punctuation at the top of one statement. Some statements (as we’ll see in later lessons) will have their own code blocks and you do not ought to add semicolons at the top of every block.
Always remember that C# is a case-sensitive language. That means you want to additionally bear in mind the correct casing of the codes you sort in your program. Some exceptions area unit string literals and comments that you’ll learn later. the subsequent lines won’t execute becase of wrong casing.
system.console.writeline("Welcome to Visual C# Tutorials!");

SYSTEM.CONSOLE.WRITELINE("Welcome to Visual C# Tutorials!");

sYsTem.cONsoLe.wRItelIne("Welcome to Visual C# Tutorials!");
Changing the casing of a string literal does not stop the code from running. the subsequent is completely okay and has no errors.
System.Console.WriteLine("WELCOME TO VISUAL C# TUTORIALS!");
But what is going to be displayed is exectly what you have got indicated within the string literal. additionally notice the employment of indention. Everytime you enter a brand new block, the codes within it ar indented by one level.
{

statement1;

}
This makes your code additional decipherable as a result of you’ll be able to simply confirm that code belongs to that block. though it’s ex gratia, it’s extremely counseled to use this follow. One nice feature of Visual Studio is its auto-indent feature thus you do not have to be compelled to worry concerning indention once getting into new blocks.
Saving Your Project and Solution
To save your project and solution, you can go to File > Save All or use the shortcut Ctrl+Shift+S. You can also press the![]() button in the toolbar.
button in the toolbar.
If you merely wish to avoid wasting one file, go to File > Save (FileName) where FileName is the name of the file to be saved. you’ll use the shortcut Ctrl+S or click the ![]() button within the toolbar.
button within the toolbar.
To open a project or solution file, go to File > Open, or find the ![]() button in the toolbar. Browse for the project of the solution file. A solution file has an extension name of .sln and a project file has an extension name of .csproj. When gap an answer file, all the coupled project to it answer are going to be opened also along with the files associated for every of the comes.
button in the toolbar. Browse for the project of the solution file. A solution file has an extension name of .sln and a project file has an extension name of .csproj. When gap an answer file, all the coupled project to it answer are going to be opened also along with the files associated for every of the comes.
Compiling the Program
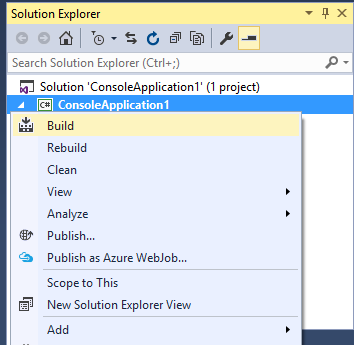
We discovered that our code must be incorporated first to Microsoft Intermediate Language before we will run it. To gather our program, go to Debug> Build Solution or simply hit F6. this can accumulate every one of the comes at interims the appropriate response. to influence one to extend, go to the appropriate response individual and right snap a venture, at that point pick Build.

Rebuild simply recompiles a solution or project. I will not need you to perpetually build the project if you’ll merely run the program as a result of capital punishment the program (as represented next) mechanically compiles the project.
You can currently realize the viable program of your project with .exe extension. to seek out this, move to the answer folder at the placement you such as after you saved the solution/project. you’ll understand here another folder for the project, and inside, understand the folder named bin, then enter the rectify folder. There you may finally understand the viable file.(If you cannot realize it in the Debug folder, attempt the Release folder).
Executing the Program
When we execute a program, Visual Studio automatically compiles our code to Intermediate Language. There are modes of executing/running a program, the Debug Mode and the Non-Debug Mode.
The Non-Debug Mode runs or executes the program disabling the debugging features of the IDE. The debugging features will be discussed in a later lesson but it allows you to step through your code and monitor the state of your application which is usefull for finding potential errors in your code. The program will be executed the same way it will be executed when it is run by the user who will use your program. By running the program in Non-Debug mode you’ll be prompted to enter any key to continue once the program reaches the tip. you’ll run in Non-Debug mode by going to Debug > begin while not Debugging in the menu bar. you’ll conjointly use the shortcut Ctrl+F5. you’ll get the subsequent output:
Welcome to Visual C# Tutorials!
Press any key to continue . . .
Note that the message “Press any key to continue…” is not part of the actual output. This will only show if you run your program in Non-Debug mode. It is only there to prompt you to press any key to exit or continue the program.
The Debug Mode is easier to access and is the default for running programs in Visual Studio. This mode is used for debugging to hunt for the cause of an error in your code. You will be ready to use break points and helper tools once exceptions area unit encountered once your program is running. Therefore, i like to recommend you to use this mode after you wish to search out errors in your program throughout runtime.To run mistreatment correct Mode, you’ll be able to go to Debug > begin Debugging or merely hit F5. as an alternative, you’ll be able to click the ![]() located at the toolbar.
located at the toolbar.
Using rectify Mode, you program can show and straightaway disappear. this can be as a result of throughout rectify Mode, once the program reaches the tip of code, it’ll mechanically exit. to stop that from happening, you’ll use the System.Console.ReadKey() method as a workaround that stops the program associated asks the user for an input. (Methods are mentioned thoroughly during a later lesson.)
namespace ConsoleApplication1
{
    class Program
    {
        static void Main()
        {
             System.Console.WriteLine("Welcome to Visual C# Tutorials!");
             System.Console.ReadKey();
        }
    }
}
Now run the program once more in correct Mode. The program can currently pause to simply accept Associate in Nursing input from you, merely hit Enter to continue or exit the program.
I would suggest to use the Non-Debug mode with great care we do not ought to add the additional Console.ReadKey() code at the top. From currently on, whenever I say run the program, i’ll be presumptuous that you simply use the Non-Debug mode unless otherwise noted. we are going to use rectify mode after we reach the subject of Exception Handling.
Importing Namespaces
Namespaces in a nutshell is a way to group code or act as a container and it can be referenced by its name.We characterized our own namespace named MyFirstProgram yet there are a large number of namespaces inside the .NET Framework Class Library. An illustration is that the System namespace that contains codes that region unit fundamental for an essential C# application. The Console class we keep an eye on region unit exploitation to print lines is truly inside the System namespace. we watch out for region unit exploitation the completely qualified name of the Console class which fuses the namespace System all through this exercise.
System.Console.WriteLine("Welcome to Visual C# Tutorials!");
System.Console.ReadKey();
This can be tedious if you may be repeatedly typewriting this over and over. luckily, we will import namespaces. we will use victimisation statements to import a namespace. Here’s the syntax:
using namespace_to_import;
Where namespace_to_import is the namespace you which to import. This instructs the whole program that you are using the contents of that namespace. So instead of using the following line of code:
System.Console.WriteLine("Hello World!");
we can simply write the following code when we import the System namespace:
Console.WriteLine("Hello World");
Using statements that imports namespaces area unit generally placed at the upmost a part of your code. Here is that the updated version of Example two that imports the System namespace.
using System;

namespace MyFirstProgram
{
    class Program
    {
        static void Main()
        {
             Console.WriteLine("Welcome to Visual C# Tutorials!");
             Console.ReadKey();
        }
    }
}
You can still use the full name of a class though if there are other classes which have the same name. Namespaces will be discussed in greater detail in another lesson.
You are now familiar with the workflow of creating a simple C# program using the basic structure and syntax of the language. The next lessons will sharpen your knowledge of C# even further.