Welcome to Visual Studio
We will now explore the important parts of the visual studio. After Visual Studio starts up, you will be welcomed by the following screenshot.
Visual Studio IDE
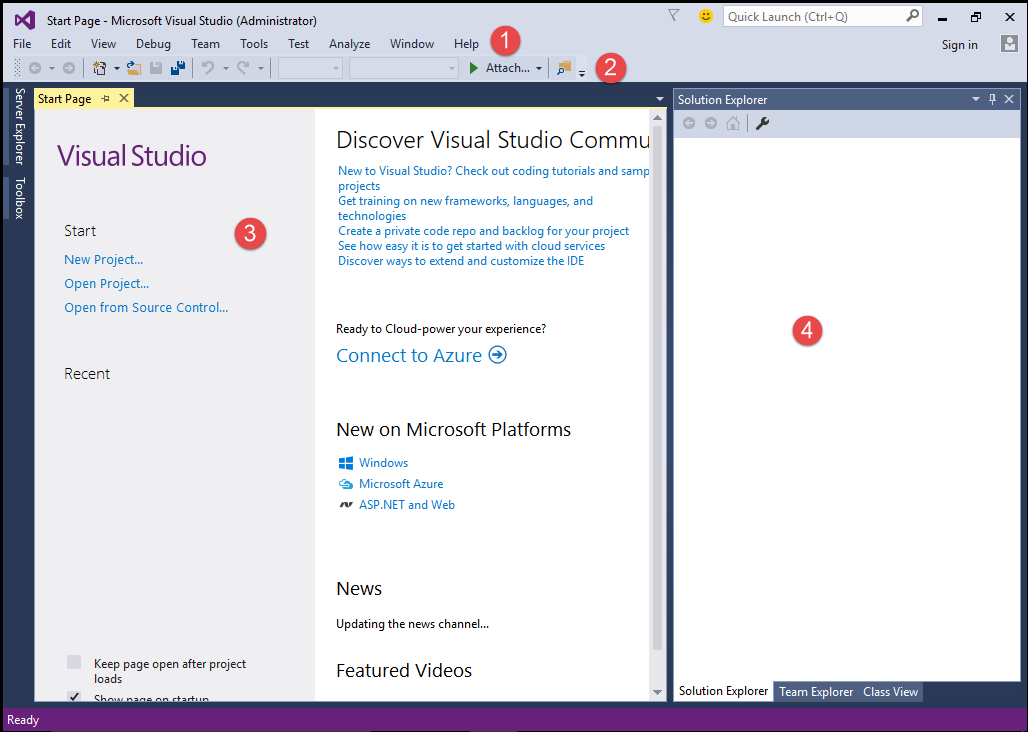
The numbered labels will be used to identify the different parts of the IDE.
The Menu Bar
The Menu Bar (1) is where the different menus for creating, developing, maintaining, debugging, and executing programs can be found. Clicking a menu will reveal another set of related menus. Note that the menu bar still has hidden menu items which will only show on certain conditions. For example, the Project menu item will show if a project is currently active. Here are some of the description of each menu item.
| Menu Item | Description |
|---|---|
| File | Contains commands to create new projects or files, open or save projects, exit or close projects, printing, and many file or project related tasks. |
| Edit | Contains commands to that are related to editing such as selecting, copying, pasting, finding, and replacing. |
| View | Allows you to open more windows that are initially hidden or add more toolbars items to the toolbar. |
| Project | Will only show once a project is open. Contains commands related to the projects you are working on. |
| Debug | Allows you to compile, debug(testing), and run the project. |
| Data | Only available on certain types of project. Contains command for connecting or creating different data sources for use in your application. |
| Format | Only available on certain types of project. Contains commands for arranging the layout of GUI components while in the Design View. |
| Tools | Contains the different tools, settings, and options for Visual Studio. |
| Test | Allows you to run and debug unit tests. |
| Window | Allows you to adjust the view or layout of the windows inside Visual Studio. |
| Help | Allows you to view the documentation and help topics, product registration details, and product version details. |
The Toolbars
The Toolbars Section (2) contains different toolbars with commonly used commands which can also be found in the menu bar. The toolbars serve as a shortcut to commands located in the menu bar. Each button has an icon that represents its functionality. You can hover on each button to show a tool tip that describes what its purpose. Some commands are initially hidden and will only show up on appropriate situations. You can also right-click on any blank area of the toolbar to add more commands. Alternatively, you can go to View > Toolbars and check items to show up more toolbars. Some buttons have arrows beside them that when clicked, shows more related commands. You can also click the arrows beside each toolbar that will allow you to add or remove more buttons to the toolbar. The left side of each toolbar allows you to move it so you can change the arrangement of the toolbars. Right-clicking an empty area in the toolbars section allows you to select more toolbars to show in the toolbar section.
The Start Page
You will see some tips, tutorials and news in the Start Page (3) section of the IDE. You can also create or open projects from here. If you have created some projects, then they will show up here in the Recent Projects section so you won’t have a hard time finding each project. You can always open the Start Page by going to View > Start Page menu.
There is more to explore in Visual Studio and more parts of the program and features will be explained in the following lessons.